Showing posts with label Pampered Chef. Show all posts

Sunday, 28 April 2013

Raspberry Mallow Crispies (egg, dairy, gluten, soya and nut free)

Mallow crispies in a Pampered Chef Petite bamboo bowl
These yummy Mallow Crispies make a great allergy friendly party food.

I love this recipe - it is the ultimate in children's party food for those with allergies as you can make it free of the big four and no-one is any the wiser.  I came across it as I was wading through many different recipe books at the beginning of my allergy mum journey, and I fixed on it as simple and easy and fitting our requirements of no egg, dairy or wheat at the time.  I had almost forgotten about it in the experimentation with cakes and biscuits, but I came across some marshmallows at the back of my cupboard yesterday and I suddenly remembered about it.

The recipe comes from Alice Sherwood's Allergy-Free Cookbook, which covers a multitude of allergies but always annoys me in the difficulty of having to swap in different things depending on the allergy, as I have to do at least two and it gets complicated!  However, don't let that put you off, as some of the recipes are great.

If you are making it gluten free, make sure your crispies are free from barley, as Kellogg's are not, and are therefore not gluten free.  Try something like these ones from Kallo.

The recipe is nearly identical to the original recipe you may remember from your childhood for rice krispies treats, but this has a wee added extra of some raspberry jam to pep it up!  If you don't fancy that then omit it and you'll have original flavour ones.

Check the marshmallows - some contain egg!  And if you want to make this vegan use veggy marshmallows, a near impossible feat in the UK without spending a fortune, but it can be done.

I like to decorate mine with a little dairy free chocolate and I love Moo Free, although its not guaranteed nut or soya free, so you may want to give it a pass.

Raspberry Mallow Crispies
Egg free, dairy free, gluten free and nut free

Ingredients

115g    marshmallows
55g      vegan margarine  I use Pure Spread Sunflower
4 tbsp   raspberry jam
140g    puffed rice cereal

Dairy free chocolate for drizzling if you fancy - watch out for nuts and soya in the chocolate though.

Method

Oil your Square Baker or Medium Bar Pan lightly to start with, with a nut free oil. (Or any baking tin about 23x23 cm)

1.  Put the marshmallows, vegan margarine and jam in a large saucepan and heat gently.  Stir constantly with a mix 'n scraper so it doesn't catch on the bottom and burn.

2.  Once everything has melted, bring to the boil for one minute, stirring all the time.

3.  Stir in the crispies and stir quickly until everything is well coated.

4.  Scrape the mix out of the pan and into the square baker, or medium bar pan for a shallower crispie.  Press down firmly with the back of the mix 'n scraper, wetted slightly to stop it sticking if you need to.

5.  Mark out your squares (I get 16 from the square baker and 24 from the medium bar pan).

6.  Leave to cool and place in the fridge for two hours to set.  Drizzle with a little dairy free chocolate if you wish, and cut into the squares with a nice sharp knife such as our Santoku knife.


7.  This stores well for three days in an airtight container.  I'm not sure about any longer as its always all eaten by then!

Sunday, 17 February 2013

Garlic pizza bread (egg / dairy free and vegan)

I often have left over pizza dough when I make pizzas with my pizza base recipe and have been making this garlic bread to accompany the meal as a way to use up the dough.  Plus its a really lovely addition to the table.
I cook my pizzas and bread on Pampered Chef Stoneware as the bases are crispy and the food is cooked beautifully evenly.  Plus the stoneware keeps the pizza and bread warm right to the last slice! And its crispy not soggy.

Make up your pizza dough recipe and then divide in three.  Use two balls to make pizza bases and the other to make a the garlic bread below.

Ingredients

1/3 portion of pizza dough
2 cloves garlic
3 tbsp Olive oil
1/2 tsp Mixed dried herbs, or chopped fresh herbs if you have them
Rock salt

Method

1.  Pre-heat the oven to 200°C. Roll the dough out on a Medium round stone with a baker's roller until nice and thin.

2.  Crush the garlic into a pinch bowl using the garlic press (the beauty of our garlic press is no peeling needed!).  Add the olive oil and herbs with the adjustable measuring spoons and stir well.

3.  Pour over the dough and spread it out with the back of a spoon to cover the whole dough up to 1/2 cm from the edges.

4.  Sprinkle with rock salt.

Dough all slashed and oiled up and ready to go.

5.  Make slashes in the dough with a sharp knife and place in the oven for 8-10 mins till golden brown.  Leave on the stone to keep warm as you eat, and cut with the pizza cutter.

Don't go kissing too many people afterwards unless they shared this with you!

Thursday, 14 February 2013

Happy Valentines Day!

Just a quick post to say Happy Valentines Day!

I made these today in my Pampered Chef square brownie pan - I love it sooo much.

I used my basic cake mix with blueberries added (I just chucked in a few handfuls I had in the fridge) and then made a buttercream icing with some mashed up blueberries added.

I cut out the centre of the top cake using the heart cutter from the creative cutters set and then added some icing between two cakes and in the heart shaped hole. Yum!

Happy Valentines Day! Blueberry cakes in the square brownie tin.

Monday, 11 February 2013

Pita Breads (Egg free/Dairy free and Vegan)

I've got myself a new camera, and I've spent the last month playing with it rather than blogging!  However, I'm now ready to rock and roll as I've managed to get the hang of the camera and I've read my way through a tonne of info including the wonderful Plate to Pixel by Helene Dujardin.  I also have benefited from some short and sweet photography lessons from my wonderful photographer brother Hamish Campbell.

This is the first of my posts with the new photos and I think you really can tell the difference.

So here we go.....

The Pita Bread recipe I used is pretty basic and I was so excited to see it work - I can't believe it does!  How does it do that puffy thing?  I can't understand it, but I love it.

I've got a brand new Rectangle Stone that I was desperate to try out too, so this was the first recipe I did on it.  I gave it a little rub down with a bit of vegetable oil first before using it, and it worked perfectly.  The stone gives a lovely even heat and the breads stayed warm for ages while we had our soup and went back for another!

Ingredients

1 tsp dried yeast
350g strong bread flour
1 tsp sugar
1 1/2 tsp salt
1 tbsp olive oil
210ml water

Extra flour for sprinkling
Oiled clingfilm to cover

Method

1.  If you have a bread maker then bung in all of the ingredients and put the machine on a pizza dough or basic dough setting.  Or use a mixer with a dough hook if you have one.  If not, mix all the ingredients in a Classic batter bowl until they form a dough, and get kneading for about 10 mins on a lightly floured surface.  The dough should be smooth and elastic at this point.

2.  If using the mixer/machine now place the dough on a lightly floured surface and divide it into ten pieces.  Roll each piece into a smooth ball.

3.  Cover the balls of dough with lightly oiled clingfilm and leave to rise for about 10 minutes.

4.  Preheat the oven to 220°C.

5.  Place the dough onto the rectangle stone or other flat stone such as the medium round stone, and flatten slightly.

6.  Roll each one out using the baker's roller into a slightly oval shape.  Sprinkle with a little flour.

7.  Leave to rest for a further 10 minutes, or if you are like me just bung them in the oven because you can't wait!

8.  Bake for around 10-14 minutes - mine took 12 minutes for the ones on the top shelf and 13 for the middle shelf! They should be lightly browned and puffed up.


9.  You can leave them on the stones or remove to a stackable cooling rack to cool.

I enjoyed mine with a fabulous sweet potato and lentil soup.  It warmed me right to my toes on a cold winter day!

These Pitas keep for about 2 days in a sealed container and toast up nicely, or you can freeze them too.


One year on......

I launched this blog a year ago as a way of documenting some of my kitchen experiments with my Pampered Chef kit and  putting some of my discoveries out there.  I have had views from all over the World in the last year and a whole lot of folks visiting from Pinterest, facebook and allergyuk.  Thanks for visiting!  It makes me feel like I'm not just talking away to myself here!  The comments people have left have been great and its nice to hear from you too.

Most of my recipes are egg and dairy free due to my youngest daughter's allergies and I've been asked so many times by people when they eat my food, in particular the cakes, "How do you do it without eggs?".  So here is a quick guide to what to use in place of eggs in baking and cooking:

I have to say I am not keen on egg replacers and very seldom use them - they really are just a mix of extra bicarbonate of soda and some other bulkers such as potato starch to make everything stick together.  I bought one box of it three and a half years ago when we first discovered that eggs were a no go area in our house, and I only ever used about a quarter of it!

So if you have a favourite eggy recipe and want to convert it to an egg free version, try the egg replacer powder if you like, but it may not work (I had several disappointments which put me right off).  You might have to play with your favourite recipes and try adding other things...

1 egg can be replaced by:

1/4 cup unsweetened apple sauce - babyfood jars are great for this - in cookies and biscuits.  Such as these choc chip cookies.

Choc chip cookies with baby apple sauce!

(I've also found I can just grate apple straight into the mix if I'm being lazy!  For example in my fruit cake.)
Mrs Mac's Fruitcake, made with apple, not egg!

1/2 mashed banana in cakes, although this does flavour it.
Chocolate and Banana Zebra bread - no egg here either, just banana!

1 tablespoon ground flax seed with 3 tablespoons of water and left to go gloopy for cakes too.

2 tablespoons water + 1 tablespoon oil + 2 tsp baking powder for cakes that need a rise.


1/2 tsp baking powder, 3/4 tsp bicarbonate of soda and 1 tsp of apple cider vinegar replaces about 2 eggs in cakes and makes them rise beautifully! See this chocolate cake for example. The taste of the vinegar disappears with the chemical reaction that takes place to create the bubbles and make the cake rise.


Chocolate cake with vinegar!  You don't taste it honest!

Its often trial and error and I've had loads of disasters, but always have found better alternatives to the egg replacer.  Have fun trying!

Saturday, 26 January 2013

Apple and Ginger Rolls (can be dairy free/egg free, vegan)


January is always difficult isn't it?  I try to be good, but weather, work and general blah after the holidays always seem to conspire against me.

Here is a recipe thats a little bit of nice, but not too naughty, especially if you serve it with something like fat free frozen yoghurt or IceDelight my favourite dairy free frozen treat!

I made mine dairy free by using vegan pastry dough (Jus-Rol Filo is vegan) and using Pure Spread not butter for the final brush.  I also used soya based cream cheese Tofutti instead of the Philadelphia.

Don't be put off by the complicated sounding rolling bit!  Its just like filling a fajita!  I should have taken blow by blow photos really; I promise some soon!

Ingredients

2.5cm piece peeled fresh ginger
2 large Granny Smith apples, peeled
1/4 cup granulated sugar
2 tsp cornflour
1/4 tsp ground cinnamon
60g reduced-fat cream cheese (Philadelphia) softened
10 sheets (9 x 14 in./23 x 35 cm) thawed frozen Filo pastry
Oil to moisten the dough
1 tbsp butter, melted
Icing sugar (optional)

Method

1. Preheat the oven to 200°C. Grate ginger using Microplane® Adjustable Fine Grater to measure 2 tsp.

2. Use the apple wedger to core and wedge the apples. Coarsely chop apples with Food Chopper.

3. Combine ginger, apples, granulated sugar, cornflour and cinnamon in Classic Batter Bowl; mix well using Small Mix ‘N Scraper®.

4. Microwave on HIGH for 3-–4 minutes or until thickened and bubbly; stir. Cool for 5 minutes. Add cream cheese and mix well.

5. Lay one sheet of the filo on Cutting Board and brush with silicone basting brush with oil or use a Kitchen Spritzer filled with your choice of oil to spray the dough. Fold filo in half crosswise. Cut folded sheet in half lengthwise, leaving folded edge intact. Spoon a rounded 1 tbsp of the filling to within 2.5 cm of folded edge of filo using Adjustable Measuring Spoon, leaving a 2.5 cm border on each side. Lift folded edge of filo up over filling, tucking filo tightly around filling. Fold sides of filo in toward center; gently roll up.
Repeat with remaining filo and filling.

6. Place rolls, seam sides down, onto Medium Bar Pan or other flat stone; lightly brush with melted butter using Chef's Silicone Basting Brush. Bake for 12–-14 minutes or until rolls are golden brown. Remove from oven to Stackable Cooling Rack. Sprinkle with icing sugar, if desired.

Yield: 10 servings of 2 rolls

Nutrients per serving:

Calories 100, Total Fat 2.5 g, Saturated Fat 1.5 g, Cholesterol 5 mg, Carbohydrate 19 g, Protein 2 g, Sodium 80 mg, Fiber 1 g


Cook's Tips:

Keep filo sheets covered with cling film while working on recipes to keep them from drying out. Wrap any leftover filo tightly with cling film and store in refrigerator for up to 2 weeks or freeze for up to 2 months.

Sunday, 14 October 2012

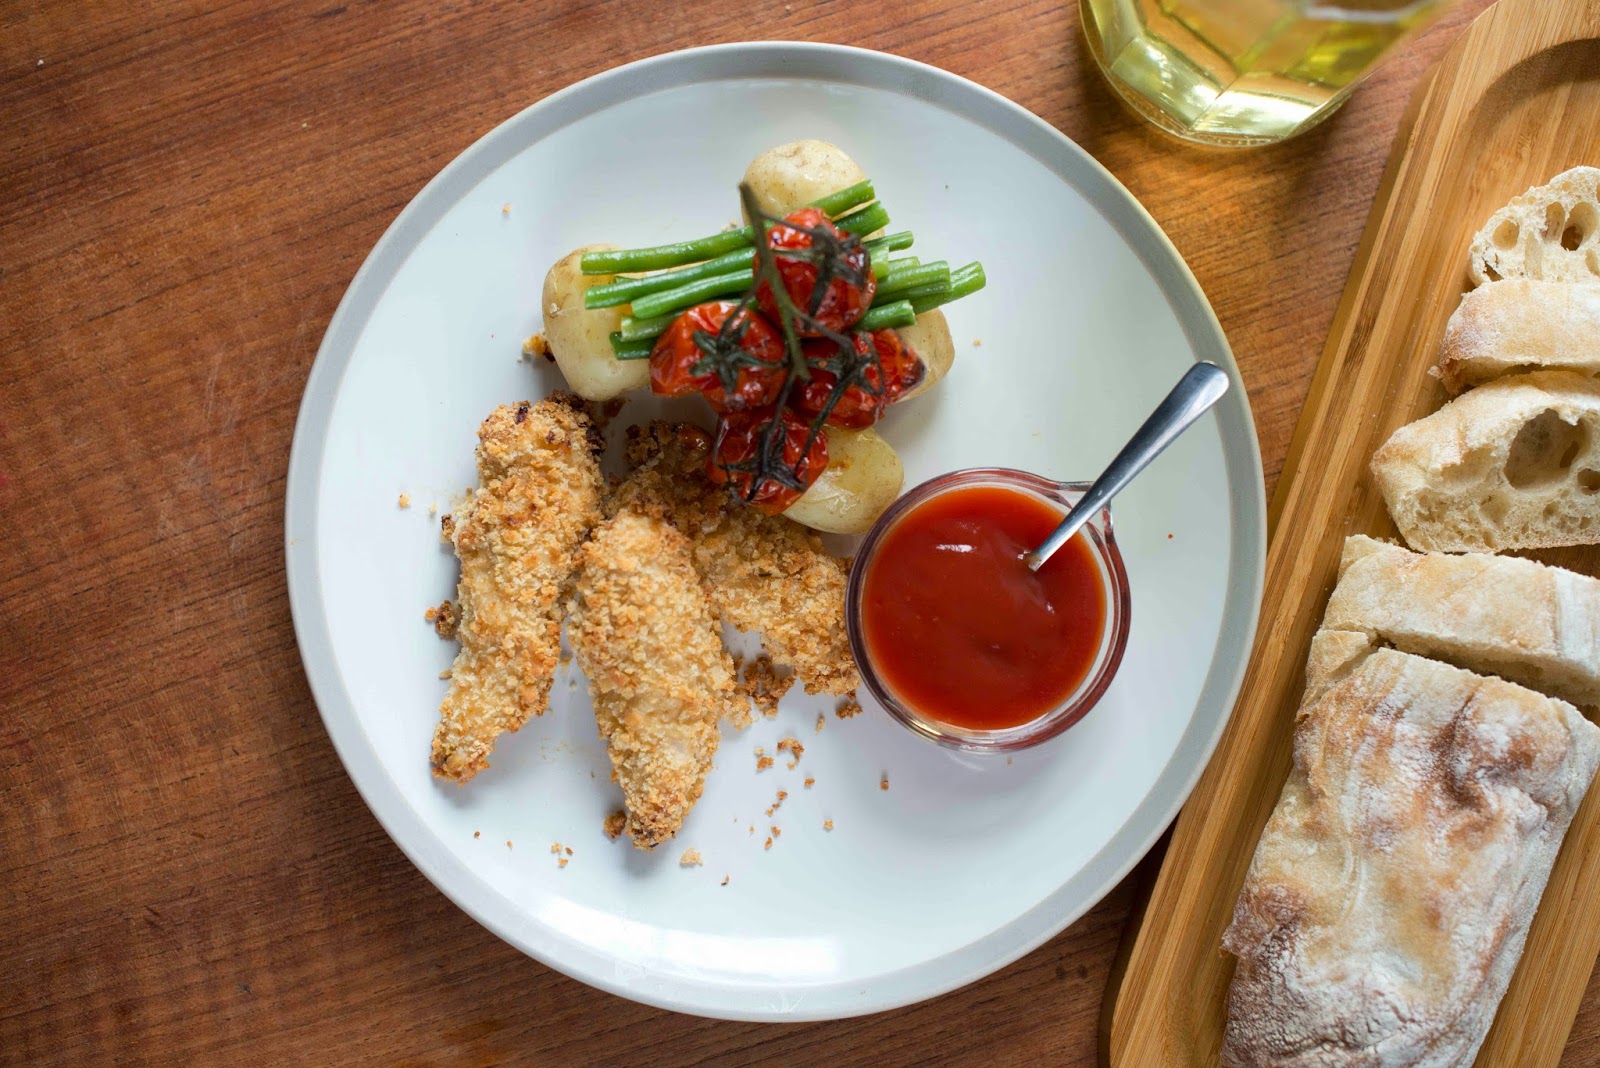
Chicken goujons (egg, dairy and gluten free)


My mum makes fantastic home made chicken goujons, or nuggets if you like.  I taste them and I'm transported back to my childhood, and a few amazing picnics when she made these and we took them along cold and dipped them in sauce to eat them with our fingers.

Having a little person with egg and dairy allergies makes the use of eggs to coat them really difficult. I went on a mission to find out how to make them for her (and us) without the addition of eggs so that we could have a happier and healthier alternative to chicken nuggets.

The fact that these are made at home means that the coating can be controlled and made gluten and wheat free too, depending on the flour or bread used for the breadcrumbs.  So I reckon you could make these pretty much allergy free!

I use this method to make home made fish fingers too.

Serves 4

Ingredients

400g pack chicken breast strips or breasts cut into even sized strips or chunks
3 tablespoons plain flour (or corn flour if GF)
2 tablespoons oil
4 tablespoons non-dairy milk (I use soya)
Two ends of a loaf of bread (use any bread you like, gluten free if needed)

Method


Preheat the oven to 180°C

1.  Place the bread in a food processor and whizz until the bread is fine breadcrumbs.

2.  Put the oil and milk in a small batter bowl and whisk until well mixed and frothy with a stainless steel whisk.

3.  Put the flour on one plate and bread crumbs on another.


4.  Coat each chicken strip well by rolling it in the flour, then transfer to the oil and milk emulsion and coat well in that too.

5.  Place the strips on the breadcrumb plate and coat in the breadcrumbs by turning and patting them on.

6.  Place the chicken on a flat stone such as a medium bar pan (you'll need two of these) or a rectangle stone, and cook in the oven for 25-30 mins until golden brown.  You could fry these, but I find as they already contain oil in the coating they bake really well.


7.  I serve these with chips or mash, peas, and plenty of sauces for dipping.  My family particularly like sweet chilli sauce.


Thank you to HCampbellPhotography for the truly beautiful food shots!


Wednesday, 29 August 2012

Ginger biscuits and lots of rain.

To say I got wet today is an understatement.  I headed out to collect daughter number one from school with the sky looking grey and a bit threatening, so I put daughter number two in the buggy with the raincover, changed out of sandals into something sturdier and put on my raincoat.  By the time I had managed to get half way along the road the heavens had opened, rivers ran across the pavements, drains bubbled, water fell off roofs in great sheets, and I was soaked to the skin!

Then the hail and thunder and lightening started.....by that time I was laughing and splashing through the huge puddles like a mad woman, while the streets emptied and others huddled in doorways.

I got to the school gates dripping wet, collected my daughter and then headed to the pool for her swimming lesson.  A comedy ten minutes ensued while the little one tried to dry my trousers with a hairdryer.  I gave up and steamed gently through the rest of the lesson!

When we finally got home I changed, dispensed warm drinks and toast and then went into the kitchen looking for solace.  I found it in the shape of these biscuits which remind me of childhood and have been in my mum's recipe folder forever.  I've recently added the stem ginger to these and find it gives a lovely additional layer of flavour.

Ginger Fairlings

Feel free to use any gluten free flour for these as it works pretty well.  They are a little crumbly but you could add a little xanthan gum to help prevent that (about 1/2 tsp is enough).  If you use Dove's Farm it already has this added in the self raising flour anyway so don't add any.

Ginger Fairlings (dairy and egg free/vegan)

Ingredients

4oz (1/2 cup) Vegan Margarine or butter
1 tbsp golden syrup
3oz (1/3 cup) sugar
6oz (1 1/4 cups) self raising flour
1 tsp ground ginger
pinch of bicarbonate of soda
2 pieces of stem ginger

Method

1. Preheat the oven to 180°C
2. Melt the margarine and syrup in a large saucepan over a medium heat.
3. Remove from the heat and add the sugar.  Stir well with a bamboo spoon.
4. Chop the stem ginger finely with a utility knife on a cutting board and add to the pan.
5. Add in the flour, ground ginger and bicarbonate of soda and stir well to mix everything to a dough.
6. Using the small scoop, scoop out balls and roll them lightly in your hands to make them smooth.  Place on a flat stone such as a medium round stone or medium bar pan.
7. I like to squash them down with a fork to make the pattern on the top but you could just give them a squish with the palm of your hand.
8. Cook for 10-15 minutes until golden brown. (Mine usually take precisely 12 mins!)
9. Leave to cool for a few minutes on the stone before removing to a cooling rack with a mini-serving spatula to cool.
10. Enjoy with a well deserved cuppa!

A nice cuppa and some vegan ginger fairlings  - ahhhh!

Thursday, 26 July 2012

My big cake secret! (dairy free, egg free and vegan cake)

This is my big secret!  Don't tell anyone will you?  I have a basic sponge recipe that is egg free, dairy free and is so simple its ridiculous!  And it doesn't contain any odd egg replacers, which I have a real aversion to.

Plain sponge with choc chips added


Ingredients
90g     Sugar
90g     Dairy free spread (I use Pure Spread)
180g   Self Raising Flour
160ml Soya milk (or other non dairy milk)

Thats it!!

Method

You can use a mixer for this but I don't have one at the moment so its all by hand here! (Good for my right arm though.)


Preheat the oven to 180°C

1. Measure the sugar and Pure spread into a classic batter bowl and mix with a bamboo spoon until nicely fluffy.

2. Add the flour and milk and mix until combined well and looking like a normal cake batter.  If its too solid add a little more soya milk.

3.  Spoon into 12 cupcake liners or leave your stoneware muffin pan naked and bake in the oven for about 12-15 mins till golden brown. (You could use the deluxe mini-muffin pan and make 24 small ones!)

4. Remove to a stackable cooling rack and cool completely before icing.

Tip:  Fancy blueberry muffins or raspberry muffins, or any other fruit for that matter?

Then bung in a good handful of fruit once the cake batter is mixed, stir them through and bake as above - YUM!  I quite often use frozen fruit - chuck them into the batter while still frozen and just increase the cooking time by a couple more minutes.

Or what about choc chip?  Chop up about 80g vegan chocolate into chunks and chuck it in.


Basic cupcakes with added British Flags by my six year old daughter for @sundaybakeclub on twitter
I've also used this to make large birthday cakes such as the Princess castle below!  Just use the above recipe in a 20cm cake tin for each layer, and bake for about 22 minutes. I added muffins and ice cream cones to this one to make the shapes.

Pink castle made from layers of vegan cake, ice cream cones and pink icing

Monday, 2 July 2012

Chicken pinwheels (egg and dairy free)

I have been super busy recently and a few weeks ago had a lovely time with visiting friends from Australia.  It meant a little bit of catering on a Monday night for a family gathering and I was determined to be organised ahead of time.  So, inspired by a sausage roll recipe I found in Good Food magazine I came up with these little bites of yummyness.

I used the Pampered Chef Manual Food Processor (or MFP) to do these and loved how easy it was.  However, you could use the Food Chopper, a knife to chop it all finely, if you can be bothered, or an ordinary run of the mill food processor.
The Manual Food Processor

(By the way, the MFP comes highly recommended for caravanning or camping and very quick yummy salsas and guacamole, as it needs only your arm as power. A kitchen tool and work out in one!)

I made mine dairy free by using puff pastry that was made without butter.  Please check your brand, but I like Jusrol's puff pastry which is made with vegetable oil, not butter. No eggs are needed here as the pastry is lovely and crisp anyway.


Chicken Pinwheels
Ingredients

4 chicken thighs (cooked and bones removed)
4 sundried tomatoes
1 clove of garlic
1 slice of bacon
handful of basil leaves
salt and pepper to season

1 pack of ready rolled puff pastry


Method

1. Take the puff pastry out of the fridge to warm a little.

2. Chop the tomatoes and chicken roughly and put into the Manual Food Processor.  Pump the handle to blend until the chicken is becoming flaky.

3.  Squeeze the garlic in the garlic press into the Manual Food Processor. Add in bacon and basil and blend again until everything is mixed and the chicken is well flaked. Season lightly with a little pepper and salt.

4.  Unroll the puff pastry and cut the sheet in half.  On each piece, spread out half the mixture and then roll the pastry into a spiral roll, pressing down at the edge to seal it.

5.  Cut into about 11 pieces for each roll and place on a flat stone (I used my medium round stones), pressing down each slice slightly to make it look a little bit tidier.  Bake for 20 mins till golden brown.

6.  Remove from the stone with a mini serving spatula and cool on a stackable cooling rack, or serve immediately. I made mine in advance and reheated before serving.


Saturday, 16 June 2012

Vegan lemon cake

I LOVE lemons and citrusy tastes and have been experimenting with vegan lemon cakes for a while.  This one has a lovely clean taste to it, not interfered with in any way.  I've felt others have been oddly "muddy" with the addition of other ingredients to substitute for the eggs. Here the lemon juice itself does the job by activating the baking powder and making everything light and fluffy.

One of these doesn't last long in our house!

You can make these with gluten free flour (I've done it by just subbing in Dove's Farm self raising with nothing else added as their mix already has xanthan gum in it).

Another option is little cupcakes.  One batch of batter will make you 12 normal sized cupcakes.  Bake these for about 18 minutes.


Ingredients

2 cups Self Raising Flour
1 cup Sugar
1 tsp Baking Powder
Zest & Juice of 1 Large Lemon (reserve 2 teaspoons of juice for the icing)
100ml Vegetable Oil
170ml Cold Water

Icing
1 cup Icing Sugar
2 tsp reserved lemon juice (plus a little water if needed)

Method

Preheat the oven to 200°C

1. Measure out the flour and sugar using a measure all cup and add to a classic batter bowl.

2. Measure the baking powder using an adjustable measuring spoon and add to the bowl.

3. Zest the lemon with the Microplane zester, add to the flour and mix well with a stainless steel whisk to aerate.

4. Use the citrus press to squeeze the lemon into an easy read measuring cup, reserve two teaspoons for the icing,  and add to the bowl.

5. Add the oil and the water, measured in the easy read measuring cup, and mix thoroughly with a mix n scraper to make sure all is combined well.

6. Pour into a stoneware loaf pan or lined loaf pan and bake for 30 minutes until fully cooked. Check it's cooked by listening to it - put your ear up close and if it's making little crackly-pop noises it could take a few more minutes. Or poke with your finger - if it bounces back nicely, its done!

7. Remove from the loaf pan and cool on a stackable cooling rack.

8. When cool, make the icing for the top. Sieve the icing sugar and stir in lemon juice and drops of water until the consistency is wet enough to spread over the cake.

TIP:  If your lemons are small use the juice of one and a half in the cake and the rest for the icing.  My lemons seem to have been organic Monsters recently!

Thank you to The Ethical Chef for the inspiration and original recipe.

Sunday, 3 June 2012

Citrus Berry Trifle

Wow I've been busy the past few weeks and haven't had much time for blogging. 

I was on the Gardening Scotland stand all day on Saturday with some Pampered Chef colleagues and I made this trifle as a display piece.  I taste tested with my husband as I made it and will definitely be making it again as the trifle is now inedible after sitting on display.  So sad!


I also think I could have a good go at making this egg and dairy free, but I'll have to work on it...I'll get back to you once I've had a go.

In the meantime, here is the original Pampered Chef recipe.

Citrus Berry Trifle

Ingredients:

4-5  limes

175  g full fat soft cheese, softened

150  ml sweetened condensed milk

350  ml whipping cream or double cream, whipped to form soft peaks

450  g fresh berries such as strawberries, raspberries and blackberries or blueberries

450  g Madeira cake, cut into 2.5 cm cubes

600  ml (about 400 g) lemon sorbet

20  g flaked almonds, toasted

Additional fresh berries, to decorate (optional)


Directions:
1.  Slice 2 limes using Ultimate Mandoline fitted with v-shaped blade; set aside. Using Zester/Scorer, zest remaining limes; finely chop zest using Chef's Knife to measure 2 teaspoons zest. Juice limes into Easy Read Measuring Cup using Citrus Press to measure 125 ml juice.

2.  In Classic Batter Bowl, whisk together soft cheese, condensed milk, lime juice and lime zest using Stainless Whisk, until smooth and combined. Attach open star tip to Easy Accent® Decorator; fill with about one-third of the whipped cream and set aside. Gently fold remaining whipped cream into soft cheese mixture with Small Mix 'N Scraper®, until smooth; set aside. Slice strawberries with Egg Slicer Plus(TM). Place mixed berries in Small Batter Bowl.
3.  Cut Madeira cake into 2.5-cm cubes on Cutting Board using Bread Knife. To assemble trifle, place half of Madeira cake cubes into bottom of Trifle Bowl. Top with half of the lemon sorbet using Small Scoop or Medium Scoop; spread evenly. Top sorbet with half of the berries and half of the soft cheese mixture. Arrange lime slices in a circular pattern against inside of bowl to decorate. Repeat layers once with remaining Madeira cake cubes, sorbet, berries and soft cheese mixture.

4.  Pipe whipped cream rosettes around rim of trifle using decorator. Coarsely chop almonds using Food Chopper; sprinkle over top of trifle before serving. Decorate with lime slices and additional berries, if desired. Serve.

Yield: Serves 16

Per serving: Energy 1382 kJ/329 kcal; Protein 3.4 g; Carbohydrate 29.9 g; Fat 22.6 g; Saturated Fat 13.5 g; Fibre 0.6 g; Salt 0.4 g

Cook's Tip: Any flavour of sorbet, such as mango, raspberry, apricot or dark cherry can be used in this recipe, if desired.

Chilled fresh lemon mousse may be substituted for the lemon sorbet, if desired. Scoop and spread the mousse gently, taking care not to crush too much air out of the mousse.

© The Pampered Chef, Ltd. 2006
www.pamperedchef.com

Friday, 6 April 2012

Apple, sultana and cinnamon hot cross buns (egg free, dairy free, vegan)

Hot Cross Bun Tear and Share Style on the Medium Round Stone
Normally I take my time and add in lots of links to the products but I have several people champing at the bit for this one so here it is!

This can be vegan or not depending on whether you use the dairy free spread or butter and what kind of milk you use.  I got the inspiration for the tear and share style from a magazine last month, but I can't remember where!  And I based my recipe on one from Baking Mad.

Ingredients
625 g strong white bread flour
7g sachet fast action yeast
75g sugar
pinch salt
2 tsp ground allspice/mixed spice
2 tsp cinnamon
50 g Pure spread or butter
250ml milk (any kind you fancy!  I used soya milk)
125ml water
1 large bramley apple
125g sultanas (UPDATE!  Having eaten several I'd add more sultanas! Maybe double it to 250g?)

For the crosses:
6tbsp plain white flour
4tbsp water

For the glaze:
2tbsp sugar
2tbsp water

Method

1. Place the flour, yeast, sugar and salt in a classic batter bowl and stir together with a mix n scraper.

2. Measure out the spices using an adjustable measuring spoon and mix into the flour.

3. Melt the fat with half of the milk in a small pan, add the remaining cold milk and 125ml cold water, so that the liquid is luke warm.

4. Pour it into the flour mixture and mix in.

5.  Peel the apple, cut and core it with the apple wedger and then chop it into tiny pieces in the food chopper.

6. Add the sultanas and finely chopped apple to the dough and knead firmly for 10 minutes (or 5 minutes in a mixer with a dough hook or on the pizza dough setting in a breadmaker) until the dough is smooth and elastic.

7. Turn the dough onto a lightly floured work surface, divide it in two and then roll one half into a long sausage, cut into 10 equal pieces. And repeat with the next one, cut into 9 pieces.

8. Pinch the edges of each piece of dough up to the centre until you have a smooth ball, turn seam side down on the worktop and roll into a smooth ball.

9. Place the buns on a medium round stone allowing space for them to double in size. I used a concentric circle pattern with one in the middle, six around it and then 12 one the outside ring.  I lined up every second one on the outside ring with the inner ring and then put one in the space.  Hope that makes sense?


10. Cover with oiled cling film and leave in a warm place until the dough has doubled in size and is sticking together (see below).  I left mine about an hour.

11. When to dough is almost ready, preheat the oven to 180°C. Mix the plain flour with enough water to make a paste of a similar consistency to butter icing in a small prep bowl.

12. Place the paste in a plastic bag and snip the end off, then pipe crosses on the hot cross buns. I did a large line across the centre one and then smaller ones radiating out.  I then made a couple of rings all the way round to give the spider web effect. (Thanks to a fellow consultant Pauline, who suggested using the Easy Accent Decorator for this bit - probably less messy than the bag!)


13. Bake for 20 to 22 mins until the buns are golden and firm.

14. To glaze dissolve 2 tbsp caster sugar in 2 tbsp water, boil for a minute then brush over the hot buns with a silicone basting brush as soon as they come out of the oven to give a shiny glaze.

15.  Leave to cool slightly then enjoy with spread, jam, nutella, or naked, whatever you fancy!