Showing posts with label egg free. Show all posts

Monday, 16 March 2015

Rhubarb Tart (vegan, dairy free, egg free, nut free)


We are in the middle of the rhubarb season in Scotland, and we have eaten a load of it this year. A lovely colleague provided us with some, as well as the usual supply from my parent's garden, so we've eaten plenty of rhubarb crumbles. But I fancied something a bit more adventurous too.  I spotted Chloe Coscarelli's Vanilla Pastry Creme recipe in her book Chloe's Vegan Desserts last year and decided I just had to have a go at making it and using it in this rhubarb tart.  I cannot praise this stuff enough - its so easy and very very very tasty!

Rhubarb Tart

Ingredients
Pastry
225g Plain Flour
130g Dairy Free Margarine (I use Pure Spread, Trex, Cookeen or block Stork)
1 1/2 tbsp of Sugar


Creme Patisserie (Vanilla Pastry Creme by Chloe Coscarelli)

1/4 cup non dairy milk
1/4 cup cornflour or arrowroot
1 can coconut milk - full fat
1/2 cup sugar
1/8 tsp salt
1 teaspoon vanilla extract


Topping

7 stalks of Rhubarb
5 tbsp Sugar
6 tbsp Water


Method

1.  Make the pastry first. Place the flour in a Classic Batter Bowl add the vegetable fat and mix well using a pastry blender, or rub in using your fingers. Once you have fine breadcrumb like texture, add the sugar and stir through.  Add 1 1/2 tbsp of water and mix into a smooth ball. (If it is still a little crumbly add another tbsp more of water.)

2.  Place the dough on a well floured surface. Roll the pastry out to fit your tart tin, and then pick up over your rolling pin and place in the tin. Use your fingers to smooth the pastry up the sides and cut off the edges with a table knife. Place in the fridge to cool for 30 mins.

3. Now make the pastry creme: Mix the non dairy milk and cornflour or starch in a small bowl with a whisk till well combined.  Place the coconut milk and sugar and salt in a pan and heat gently until just bubbling.  Add the cornflour and non dairy milk mixture whisking continuously.  Heat till boiling and boil for two or three minutes until very thick, stir frequently.  Remove from the heat, mix in the vanilla and put into a small batter bowl.  Cover with a layer of cling film on the surface of the creme to prevent a skin forming. Refrigerate until cool (this can take up to 3hrs).

4.  Place baking parchment over the pastry and add baking balls, or dry rice and blind bake in the oven at 200°C for 10 mins or until pale golden.  Remove the baking balls and parchment and leave to cool on a rack in the tin while you prepare the filling.

5.  Chop the rhubarb into lengths to fit your baking tin.  Place the sugar, water and chopped rhubarb in a pan and heat very gently for ten minutes until the rhubarb starts to soften.  Leave in the juice to cool.

6.  Once everything is cooled, add creme to the pastry case (you will have spare), and arrange the rhubarb on top.  Drizzle over the syrup from the rhubarb and serve.


Wednesday, 10 December 2014

Mincemeat Crumble Slice (vegan, dairy free, egg free and nut free)

Yum

I know mincemeat slice doesn't sound very vegan, but honestly, this is mincemeat in the sweet sense; made of sultanas, raisins, apples and peel mixed with spices and is a staple of Christmas cooking in the UK.

I like this recipe for mincemeat from Pig in the Kitchen, but I've found most supermarket brands are actually vegan anyway.

I love making mince pies at Christmas time - I don't allow myself to do it until the 1st December though as it makes me feel Christmas is fully on the way then.  This mincemeat slice, however, is a lot less hassle, much faster and tends to be cooked as soon as I get my hands on a big jar of mincemeat in the supermarket!


Mincemeat Crumble Slice

Ingredients

500g Self Raising Flour
200g sugar
250g non-dairy margarine (I use solid Stork or Pure Spread)
100ml non-dairy milk, divided
600g mincemeat (about 1 and a 1/2 jars)

Method

Preheat the oven to 180°C

1.  Place the self raising flour, sugar and margarine in a Classic Batter bowl.  Use a Pastry Blender (my new favourite add on!) or a Mix n Masher to mix them together to create a sandy, breadcrumb mixture.

2.  Remove half the mix to another bowl.  Add 60ml non dairy milk to one of the bowls and mix it all together with your hands to create a dough.  Press this into the bottom of a Medium Bar Pan and smooth out to create the bottom layer.

3.  Spread the mincemeat across the layer of pastry and smooth out so there is an even layer.

4.  Now take the other half of the crumb mix and add 40ml non dairy milk.  You want to now create a rubble style of crumble with this, not a single ball but lots of little bits, so get your hands in and get squishing!  Spread this evenly across the mincemeat and put in the oven for 20-25 minutes until golden brown.

5.  Leave in the bar pan to cool for about 15-20 minutes before cutting or it will crumble.  Use a Mini Serving Spatula to remove from the bar pan and serve. This keeps well in a sealed container for 3-4 days.


Sunday, 20 April 2014

Alternative Easter Treats - Hot Cross Cookies (Egg Free, Dairy Free, Vegan and can be Gluten Free)

My blog has been getting a massive amount of hits in the past few weeks with people popping in to have a look at my Hot Cross Bun recipe which I posted two years ago.  I love it to bits but I reckoned it was time for a change this year.  So I've made Hot Cross Cookies instead!  I spotted a recipe for them in Good Housekeeping magazine, but it was completely unsuitable for my family, being full of eggs and butter, so I had a go at inventing my own based on the Good Housekeeping recipe and my favourite Chocolate Chip Cookie recipe, and they worked out pretty well...

To make these gluten free simply substitute in your favourite gluten free flour mix.  I tend to use Dove's Farm but have recently tried Bob's Red Mill and loved the texture.

Hot Cross Cookies (Egg Free, Dairy Free, Vegan and can be Gluten Free)

Makes 30 cookies when using the small scoop

Ingredients
2/3 cup Pure Spread
1/2 cup brown sugar
1/2 cup granulated sugar
1 tsp vanilla extract
1 small jar baby applesauce (unsweetened) or 1/4 cup applesauce, mashed to remove lumps
1 3/4 cups plain flour
1/2 tsp bicarbonate of soda
1/2 tsp salt
1/4 heaped tsp mixed spice
1/2 cup sultanas
1/2 cup raisins
1/4 cup mixed peel

Icing
3 tbsp icing sugar
2 tsp water


Method
1. Preheat the oven to 190°C

2. In a classic batter bowl, mix together the Pure Spread, brown sugar, granulated sugar, vanilla and applesauce with a mix 'n' scraper till smooth. I use a Measure all Cup to measure all of these ingredients out.

3. In a stainless mixing bowl combine the flour with the bicarbonate of soda, salt and mixed spice, measured using an adjustable measuring spoon, and whisk together with a stainless whisk.

4. Add mixtures together and combine until creamy. Stir in the raisins, sultanas and peel until well mixed.

5. Using a small scoop drop the dough onto flat stoneware such as the medium round stone, medium bar pan or rectangular stone.  Flatten each cookie slightly with the heel of your hand or a spoon dipped in a little water to stop it sticking. Make sure you leave spreading space between each cookie as they do like a bit of extra room!

6. Bake for 10-12 minutes or until lightly golden brown. Cook a tiny bit longer if you like your cookies on the crispy rather than chewy side.

7. Leave to cool on the stone for a few minutes before removing with a large serving spatula to a stackable cooling rack.

8. Once cooled, ice a small cross one each biscuit using water icing in a squeezy bottle with a small plain nozzle from the decorator bottle set.


Sunday, 21 July 2013

Apple Crumble cupcakes (Gluten free, egg free, dairy free, nut free, soya free and vegan!)

These cupcakes were created as an entry for a Pampered Chef competition for their consultants. The challenge was to make a cupcake that could be cooked for Party Hour which is a super quick show and allows guests and host to enjoy a Pampered Chef show even if they are pushed for time.  I went for an allergy free cupcake as I feel that the recipe should be available to as many people as possible, and just because you have an allergy doesn't mean you shouldn't have a cupcake!

Don't be put off by the list of ingredients. It may seem a lot but it is just a bit of repetition in the crumble topping, and dairy free, egg free cooking needs a bit of extra oomph sometimes!

Apple Crumble Cupcakes #eggfree #dairyfree #glutenfree #nutfree #soyfree #vegan www.mypamperedlifeuk
 Crumble Topping
¾ cup Gluten free self raising flour
½ cup brown sugar
½ tsp ground cinnamon
1/8 tsp salt
1/3 cup vegan margarine, melted

Cupcakes
1 ½ cups Gluten free self raising flour
½ cup sugar
1 tsp baking powder
¼ tsp ground cinnamon
¼ tsp salt
½ cup rice milk
½ cup vegetable oil
1 tsp apple cider vinegar
1 tsp vanilla extract
2 apples
100g Jar Apple Sauce, divided into 2 tbsp and 12 tsp

Icing
4 tbsp icing sugar
1 tbsp water
Ready rolled white icing

1.   Preheat the oven to 180°C.  Place cupcake cases in the 12-cup Muffin Pan.  Into the 2L Stainless Mixing Bowl, measure out the Crumble topping ingredients using an Easy Read Measuring Cup and the Adjustable Measuring Spoon teaspoon.  Mix together with two forks until the topping is crumbly and has small lumps in it. Set aside.

2.   Into the 4L Stainless Mixing Bowl measure out the flour, sugar, baking powder, cinnamon and salt. In a Small Batter Bowl whisk together the milk, oil, vinegar, 2 tbsp apple sauce, and vanilla using a Stainless Whisk, until frothy.

3.   Wedge the apples with the Apple Wedger and then chop into fine chunks with a FoodChopper. Add to the flour mix.

4.   Pour the wet mix into the dry flour mixture and mix until just together with a Mix N Scraper.  Quickly Scoop into the paper cases using a Large Scoop.
Sprinkle the crumble topping over the cupcakes and press down slightly to make it stick.  Bake for 12-15 minutes until golden brown. 

5.   Meanwhile prepare the icing by mixing the icing and water together and scooping into a Decorator Bottle with the round nozzle attached.  Use the apple cutter from the Creative Cutter Set stamp out 12 apple shapes from the ready rolled icing.

6.   Remove cupcakes from the oven and leave to sit for a few minutes before removing from the stone.

7.   Carefully remove the cupcakes from the stone (see chef’s tip) and place on Stackable Cooling Rack.  While the cupcakes are still warm you can drizzle icing over in random patterns, add a teaspoon of apple sauce to the top of each one and place an apple shape on the top.

Chef’s Tip: Use a micro scraper to ease the cupcakes out of the wells without spilling too much crumble topping everywhere.
If you don't want to top with the apple shape then simply add the drizzled icing and stop there.

Sunday, 7 April 2013

Toffee Apple Tart (egg and dairy free, vegan)

I first tried this recipe back in the Autumn of 2011, and on reflection it probably is quite appropriate for that time of year, however I had guests last week and was looking for an easy make ahead tart.  Plus, I had masses of apples!

Allergy friendly toffee apple tart, apple pie

The original recipe came from the lovely Ruth Clemens at The Pink Whisk and can be found here. As we don't do dairy and eggs I adapted the pastry and used my Mum's tried and tasted recipe for my very favourite shortcrust pastry.  I also added a little more cinnamon as I love the warmth of the flavour coming through the apples.

My guests for lunch were my fabulous brother and his gorgeous partner.  My brother happens to be a professional photographer and he insisted on taking a photo for me. (It does look so much more professional than mine, but I'm learning!)  So thank you Hamish for some amazing photos and lovely company while we ate. You can see more of Hamish's work at HCampbell Photography.

Ingredients

Pastry


150g plain flour

85g non dairy margarine (I used block Stork)

1 tbsp sugar

2-3 tbsp water, as much as the dough requires to come together

Filling

70g fresh breadcrumbs (2 slices of bread)

1 tsp cinnamon

3 apples - I used a mix of bramley and braeburn but most tart apples will do!

200g demerara sugar

50ml water

10g non dairy margarine

1tsp vinegar

1 tbsps golden syrup

I used an 8 inch tart pan, which I greased a little before putting in the pastry, but I reckon this would translate brilliantly into mini tarts in the new Mini tart pans.


Method

1.  In a food processor, pulse the flour and margarine together until it looks like fine breadcrumbs. (You can do this the old fashioned way with your hands or a pastry blender if need be).

2.  Add the sugar and pulse to blend it in.

3.  Remove the mixture from the processor and add to a classic batter bowl.  Mix in 2 tbsp of cold water and mix to bring the dough together.  If it is still crumbly add another tablespoon of water. Squeeze the dough into a lump of dough and allow to rest. Put it in the fridge in the batter bowl if it is warm in the kitchen.

4. Make the breadcrumbs by adding the bread to the processor and pulsing (a little of the crust isn't going to do any harm mixed in!).  Once finely chopped, add the tsp of cinnamon and pulse again to combine.

5. Pre heat the oven to 180°C.  Roll out the pastry on a lightly floured surface (I love the flexible cutting mats for this.)

6.  Lift the pastry gently on the rolling pin, and lift it over the tart pan.  Push the pastry into the sides and down into the bottom.  If it tears just use a little from the extra at the edges to patch it up.  Trim the edges off cleanly.

7.  Line the tart case with baking parchment and dried rice or baking beans.  Bake for 15 mins, then remove the beans and paper (pour them onto a tray to cool, not back in their pot straight away!) and put the tart case back in the oven or around 5 mins till its a light golden brown and firm on the base.

8.  While the tart cools a little peel your apples and then use an apple wedger to core and wedge them.  Then cut them into small chunks as illustrated in the pictures.

9.  Pour the breadcrumbs into the tart case  and spread them out evenly, then add the apple chunks on top.

10. Place the demerara sugar, water, margarine, vinegar and golden syrup in a pan and gently heat it to melt everything together.  Cook until the sugar dissolves and there are no grainy bits obvious, stirring all the time.

11. Pour the sauce over the apples, covering them all.

12. Bake in the oven for 25-30 minutes, until the apples are beginning to brown lightly. Then remove and cool on a stackable cooling rack.

I served it naked with no accompaniments, but ice-cream or any kind of cream would go down very well!

Sunday, 31 March 2013

Caravan Biscuits for the holidays! (Dairy free, egg free, vegan and can be gluten free)

vegan, gluten free, oat caravan biscuits

This recipe is the result of my mum clipping recipes in the 1970's.  She is pretty sure this one originally came from the fabulous people at Good Housekeeping, and its served us well over the years!  (We don't know why they are called Caravan biscuits though! Any ideas, please let me know?)

These biscuits, or cookies if you prefer, are slightly crunchy, chewy in the middle and full of knobbly oaty bits.  Naturally vegan with the use of vegan margarine, they can also be gluten free if you use gluten free flour and add a 1/4 tsp xanthan gum.

Chuck a few handfuls of raisins or chopped cherries in and you have fruity, oaty biscuits, and boy are they good!

Caravan Biscuits 

Makes 20

Ingredients

120g plain flour
1/2 tsp baking powder
large pinch salt
large pinch cream of tartar
120g vegan margarine (I use Pure Spread Sunflower)
120g sugar
120g rolled oats
1 level tsp bicarbonate of soda (baking soda)
2 tsp hot water
2 tablespoons syrup


Method

Preheat the oven to 180°C

1. Sift the flour, baking powder, salt and cream of tartar together and set aside.

2. Beat the margarine to soften in a classic batter bowl and add the sugar. Beat in.
3. Add the oats and stir to combine.

4. Dissolve the bicarbonate of soda in the hot water in a pinch bowl.

5. Warm the syrup slightly then measure it out using a measure all cup.

6. Add to the margarine and sugar mix. Beat in.

7. Add the flour and mix until well combined.

8. If the mixture is very solid you can warm it slightly in the microwave to make it easier to handle, and then form small balls. If too warm leave it to cool slightly before you handle it.

9. Place on flat stoneware (I used my rectangle stone, and my medium stone) and flatten slightly with the palm of your hand.

10. Bake at 180°C for 8-10 minutes until lightly golden. Don't let them get too dark of they will be bitter!

11. Allow to cool slightly on the trays before removing to a cooling rack.


Sunday, 17 February 2013

Garlic pizza bread (egg / dairy free and vegan)

I often have left over pizza dough when I make pizzas with my pizza base recipe and have been making this garlic bread to accompany the meal as a way to use up the dough.  Plus its a really lovely addition to the table.
I cook my pizzas and bread on Pampered Chef Stoneware as the bases are crispy and the food is cooked beautifully evenly.  Plus the stoneware keeps the pizza and bread warm right to the last slice! And its crispy not soggy.

Make up your pizza dough recipe and then divide in three.  Use two balls to make pizza bases and the other to make a the garlic bread below.

Ingredients

1/3 portion of pizza dough
2 cloves garlic
3 tbsp Olive oil
1/2 tsp Mixed dried herbs, or chopped fresh herbs if you have them
Rock salt

Method

1.  Pre-heat the oven to 200°C. Roll the dough out on a Medium round stone with a baker's roller until nice and thin.

2.  Crush the garlic into a pinch bowl using the garlic press (the beauty of our garlic press is no peeling needed!).  Add the olive oil and herbs with the adjustable measuring spoons and stir well.

3.  Pour over the dough and spread it out with the back of a spoon to cover the whole dough up to 1/2 cm from the edges.

4.  Sprinkle with rock salt.

Dough all slashed and oiled up and ready to go.

5.  Make slashes in the dough with a sharp knife and place in the oven for 8-10 mins till golden brown.  Leave on the stone to keep warm as you eat, and cut with the pizza cutter.

Don't go kissing too many people afterwards unless they shared this with you!

Monday, 11 February 2013

Pita Breads (Egg free/Dairy free and Vegan)

I've got myself a new camera, and I've spent the last month playing with it rather than blogging!  However, I'm now ready to rock and roll as I've managed to get the hang of the camera and I've read my way through a tonne of info including the wonderful Plate to Pixel by Helene Dujardin.  I also have benefited from some short and sweet photography lessons from my wonderful photographer brother Hamish Campbell.

This is the first of my posts with the new photos and I think you really can tell the difference.

So here we go.....

The Pita Bread recipe I used is pretty basic and I was so excited to see it work - I can't believe it does!  How does it do that puffy thing?  I can't understand it, but I love it.

I've got a brand new Rectangle Stone that I was desperate to try out too, so this was the first recipe I did on it.  I gave it a little rub down with a bit of vegetable oil first before using it, and it worked perfectly.  The stone gives a lovely even heat and the breads stayed warm for ages while we had our soup and went back for another!

Ingredients

1 tsp dried yeast
350g strong bread flour
1 tsp sugar
1 1/2 tsp salt
1 tbsp olive oil
210ml water

Extra flour for sprinkling
Oiled clingfilm to cover

Method

1.  If you have a bread maker then bung in all of the ingredients and put the machine on a pizza dough or basic dough setting.  Or use a mixer with a dough hook if you have one.  If not, mix all the ingredients in a Classic batter bowl until they form a dough, and get kneading for about 10 mins on a lightly floured surface.  The dough should be smooth and elastic at this point.

2.  If using the mixer/machine now place the dough on a lightly floured surface and divide it into ten pieces.  Roll each piece into a smooth ball.

3.  Cover the balls of dough with lightly oiled clingfilm and leave to rise for about 10 minutes.

4.  Preheat the oven to 220°C.

5.  Place the dough onto the rectangle stone or other flat stone such as the medium round stone, and flatten slightly.

6.  Roll each one out using the baker's roller into a slightly oval shape.  Sprinkle with a little flour.

7.  Leave to rest for a further 10 minutes, or if you are like me just bung them in the oven because you can't wait!

8.  Bake for around 10-14 minutes - mine took 12 minutes for the ones on the top shelf and 13 for the middle shelf! They should be lightly browned and puffed up.


9.  You can leave them on the stones or remove to a stackable cooling rack to cool.

I enjoyed mine with a fabulous sweet potato and lentil soup.  It warmed me right to my toes on a cold winter day!

These Pitas keep for about 2 days in a sealed container and toast up nicely, or you can freeze them too.


One year on......

I launched this blog a year ago as a way of documenting some of my kitchen experiments with my Pampered Chef kit and  putting some of my discoveries out there.  I have had views from all over the World in the last year and a whole lot of folks visiting from Pinterest, facebook and allergyuk.  Thanks for visiting!  It makes me feel like I'm not just talking away to myself here!  The comments people have left have been great and its nice to hear from you too.

Most of my recipes are egg and dairy free due to my youngest daughter's allergies and I've been asked so many times by people when they eat my food, in particular the cakes, "How do you do it without eggs?".  So here is a quick guide to what to use in place of eggs in baking and cooking:

I have to say I am not keen on egg replacers and very seldom use them - they really are just a mix of extra bicarbonate of soda and some other bulkers such as potato starch to make everything stick together.  I bought one box of it three and a half years ago when we first discovered that eggs were a no go area in our house, and I only ever used about a quarter of it!

So if you have a favourite eggy recipe and want to convert it to an egg free version, try the egg replacer powder if you like, but it may not work (I had several disappointments which put me right off).  You might have to play with your favourite recipes and try adding other things...

1 egg can be replaced by:

1/4 cup unsweetened apple sauce - babyfood jars are great for this - in cookies and biscuits.  Such as these choc chip cookies.

Choc chip cookies with baby apple sauce!

(I've also found I can just grate apple straight into the mix if I'm being lazy!  For example in my fruit cake.)
Mrs Mac's Fruitcake, made with apple, not egg!

1/2 mashed banana in cakes, although this does flavour it.
Chocolate and Banana Zebra bread - no egg here either, just banana!

1 tablespoon ground flax seed with 3 tablespoons of water and left to go gloopy for cakes too.

2 tablespoons water + 1 tablespoon oil + 2 tsp baking powder for cakes that need a rise.


1/2 tsp baking powder, 3/4 tsp bicarbonate of soda and 1 tsp of apple cider vinegar replaces about 2 eggs in cakes and makes them rise beautifully! See this chocolate cake for example. The taste of the vinegar disappears with the chemical reaction that takes place to create the bubbles and make the cake rise.


Chocolate cake with vinegar!  You don't taste it honest!

Its often trial and error and I've had loads of disasters, but always have found better alternatives to the egg replacer.  Have fun trying!

Sunday, 11 November 2012

Sticky Toffee Pudding (Vegan, Egg free and Dairy free)


I love a good sticky toffee pudding.  It is one of the staples of British menus and I quite often will choose it if it is on the menu in a restaurant.  I have had good and bad ones, and some truly awful ones!  For me it should not contain raisins, but should be heavy and toffee-like with the weight of the dates it contains. Although, it should also be light enough to make you want to eat more than two spoonfuls.

I found this recipe while searching for an egg and dairy free alternative for family Christmases, and then of course I had to tweak it! 

Ingredients

200g dates
250ml soya milk
100ml water
1 tsp bicarbonate of soda
115g vegan margarine (I use Pure Spread)
115g soft brown sugar
200g self raising flour
A few scrapings of fresh nutmeg
1/4 teaspoon ground ginger
1/4 teaspoon ground cinnamon

Toffee Sauce
100g golden syrup
200g soft brown sugar
150g vegan margarine
1 teaspoon vanilla extract
100ml soya cream

Method

1. Pre-heat the oven to 190°C

2. Chop the dates using a santoku knife on a cutting board and put them in a small saucepan.  Cover with the soya milk and water and simmer until the dates are soft.

3. Take the dates off the heat and stir in the bicarbonate of soda, which will froth as you add it to the date mixture. Leave to cool.

4. Beat together the margarine and sugar in a Classic Batter Bowl with a mix n scraper until pale.  Add the date mixture & stir in.

5. Measure the spices using an adjustable measuring spoon, and mix the spices into the flour. Sieve the flour and fold into the wet mixture.

6. Spoon the sponge mixture into a square baker (or a lined 20cm square tin).

7. Bake in the pre-heated oven for 30 minutes or until a cake tester comes out clean.  I usually listen to mine - is its still making little crackling noises give it a few more minutes!

8. To make the sauce, melt the syrup, margarine, sugar and vanilla extract in a small saucepan and simmer for 5 minutes without stirring. Leave to cool slightly and then stir in the soya cream with a mix n scraper.

9. Pour half the toffee sauce over the pudding. Serve with the rest of the sauce in a jug and add some dairy free ice cream. Fruit ice creams and sorbets work well too.


Based on the recipe from the Vegetarian Cookery School

Sunday, 14 October 2012

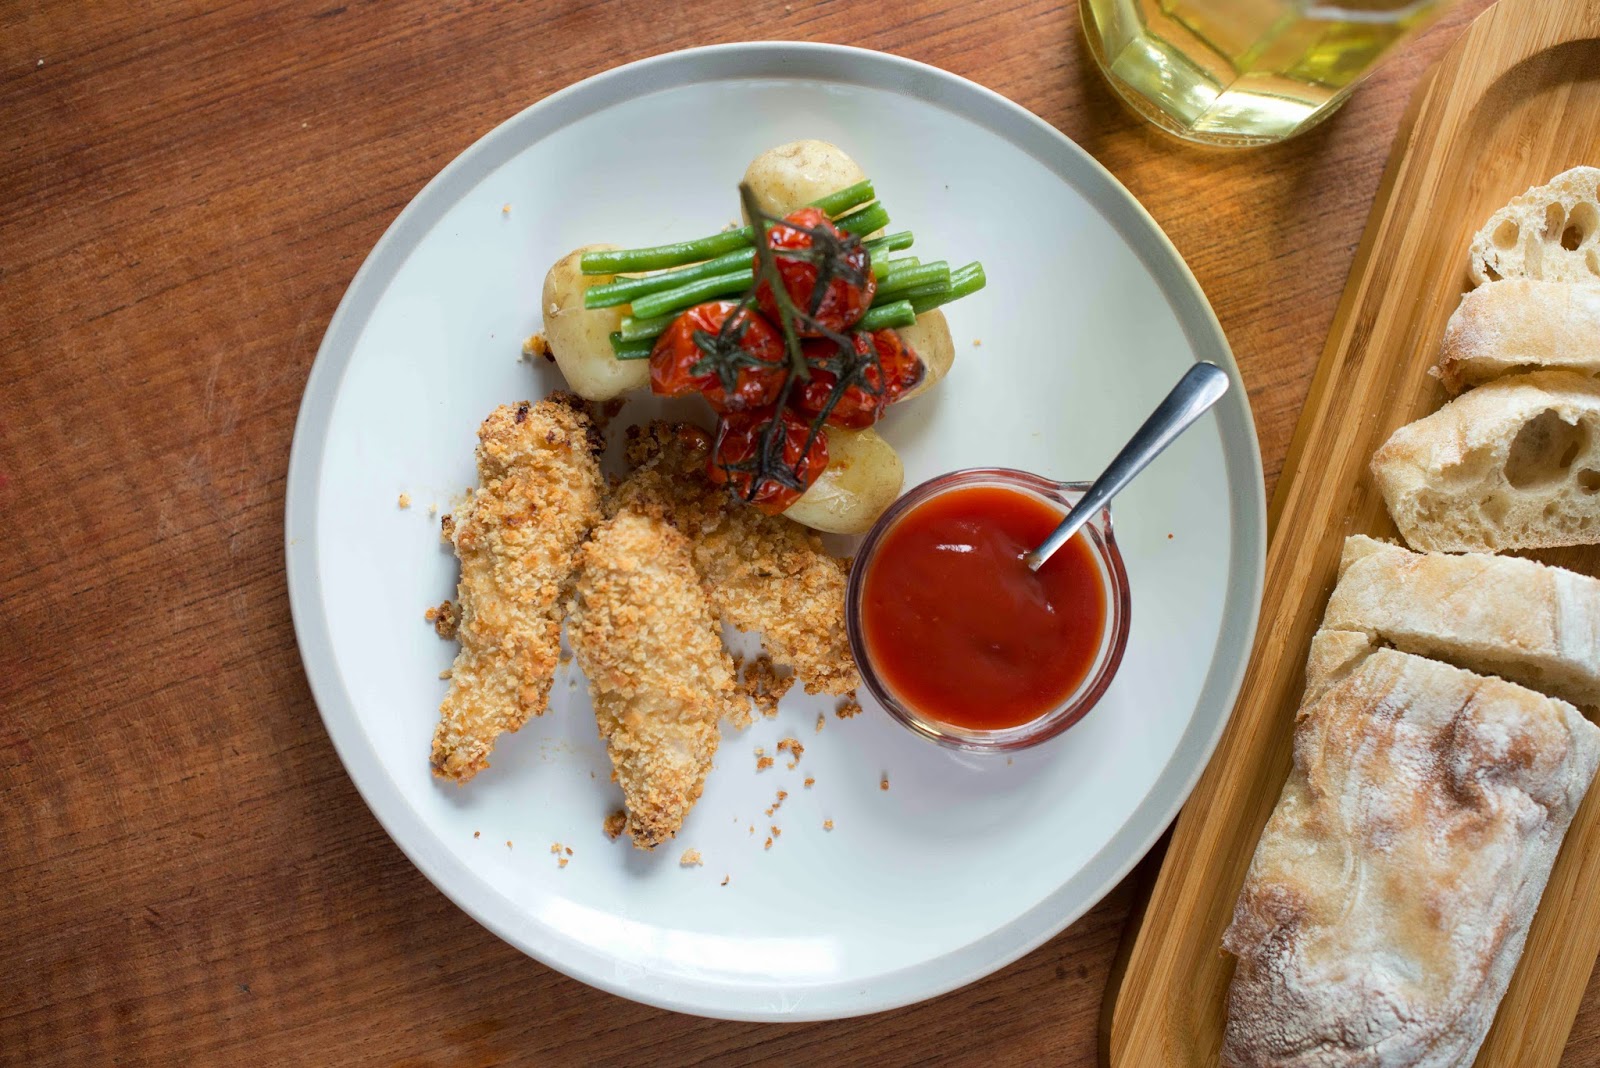
Chicken goujons (egg, dairy and gluten free)


My mum makes fantastic home made chicken goujons, or nuggets if you like.  I taste them and I'm transported back to my childhood, and a few amazing picnics when she made these and we took them along cold and dipped them in sauce to eat them with our fingers.

Having a little person with egg and dairy allergies makes the use of eggs to coat them really difficult. I went on a mission to find out how to make them for her (and us) without the addition of eggs so that we could have a happier and healthier alternative to chicken nuggets.

The fact that these are made at home means that the coating can be controlled and made gluten and wheat free too, depending on the flour or bread used for the breadcrumbs.  So I reckon you could make these pretty much allergy free!

I use this method to make home made fish fingers too.

Serves 4

Ingredients

400g pack chicken breast strips or breasts cut into even sized strips or chunks
3 tablespoons plain flour (or corn flour if GF)
2 tablespoons oil
4 tablespoons non-dairy milk (I use soya)
Two ends of a loaf of bread (use any bread you like, gluten free if needed)

Method


Preheat the oven to 180°C

1.  Place the bread in a food processor and whizz until the bread is fine breadcrumbs.

2.  Put the oil and milk in a small batter bowl and whisk until well mixed and frothy with a stainless steel whisk.

3.  Put the flour on one plate and bread crumbs on another.


4.  Coat each chicken strip well by rolling it in the flour, then transfer to the oil and milk emulsion and coat well in that too.

5.  Place the strips on the breadcrumb plate and coat in the breadcrumbs by turning and patting them on.

6.  Place the chicken on a flat stone such as a medium bar pan (you'll need two of these) or a rectangle stone, and cook in the oven for 25-30 mins until golden brown.  You could fry these, but I find as they already contain oil in the coating they bake really well.


7.  I serve these with chips or mash, peas, and plenty of sauces for dipping.  My family particularly like sweet chilli sauce.


Thank you to HCampbellPhotography for the truly beautiful food shots!


Thursday, 26 July 2012

My big cake secret! (dairy free, egg free and vegan cake)

This is my big secret!  Don't tell anyone will you?  I have a basic sponge recipe that is egg free, dairy free and is so simple its ridiculous!  And it doesn't contain any odd egg replacers, which I have a real aversion to.

Plain sponge with choc chips added


Ingredients
90g     Sugar
90g     Dairy free spread (I use Pure Spread)
180g   Self Raising Flour
160ml Soya milk (or other non dairy milk)

Thats it!!

Method

You can use a mixer for this but I don't have one at the moment so its all by hand here! (Good for my right arm though.)


Preheat the oven to 180°C

1. Measure the sugar and Pure spread into a classic batter bowl and mix with a bamboo spoon until nicely fluffy.

2. Add the flour and milk and mix until combined well and looking like a normal cake batter.  If its too solid add a little more soya milk.

3.  Spoon into 12 cupcake liners or leave your stoneware muffin pan naked and bake in the oven for about 12-15 mins till golden brown. (You could use the deluxe mini-muffin pan and make 24 small ones!)

4. Remove to a stackable cooling rack and cool completely before icing.

Tip:  Fancy blueberry muffins or raspberry muffins, or any other fruit for that matter?

Then bung in a good handful of fruit once the cake batter is mixed, stir them through and bake as above - YUM!  I quite often use frozen fruit - chuck them into the batter while still frozen and just increase the cooking time by a couple more minutes.

Or what about choc chip?  Chop up about 80g vegan chocolate into chunks and chuck it in.


Basic cupcakes with added British Flags by my six year old daughter for @sundaybakeclub on twitter
I've also used this to make large birthday cakes such as the Princess castle below!  Just use the above recipe in a 20cm cake tin for each layer, and bake for about 22 minutes. I added muffins and ice cream cones to this one to make the shapes.

Pink castle made from layers of vegan cake, ice cream cones and pink icing

Monday, 2 July 2012

Chicken pinwheels (egg and dairy free)

I have been super busy recently and a few weeks ago had a lovely time with visiting friends from Australia.  It meant a little bit of catering on a Monday night for a family gathering and I was determined to be organised ahead of time.  So, inspired by a sausage roll recipe I found in Good Food magazine I came up with these little bites of yummyness.

I used the Pampered Chef Manual Food Processor (or MFP) to do these and loved how easy it was.  However, you could use the Food Chopper, a knife to chop it all finely, if you can be bothered, or an ordinary run of the mill food processor.
The Manual Food Processor

(By the way, the MFP comes highly recommended for caravanning or camping and very quick yummy salsas and guacamole, as it needs only your arm as power. A kitchen tool and work out in one!)

I made mine dairy free by using puff pastry that was made without butter.  Please check your brand, but I like Jusrol's puff pastry which is made with vegetable oil, not butter. No eggs are needed here as the pastry is lovely and crisp anyway.


Chicken Pinwheels
Ingredients

4 chicken thighs (cooked and bones removed)
4 sundried tomatoes
1 clove of garlic
1 slice of bacon
handful of basil leaves
salt and pepper to season

1 pack of ready rolled puff pastry


Method

1. Take the puff pastry out of the fridge to warm a little.

2. Chop the tomatoes and chicken roughly and put into the Manual Food Processor.  Pump the handle to blend until the chicken is becoming flaky.

3.  Squeeze the garlic in the garlic press into the Manual Food Processor. Add in bacon and basil and blend again until everything is mixed and the chicken is well flaked. Season lightly with a little pepper and salt.

4.  Unroll the puff pastry and cut the sheet in half.  On each piece, spread out half the mixture and then roll the pastry into a spiral roll, pressing down at the edge to seal it.

5.  Cut into about 11 pieces for each roll and place on a flat stone (I used my medium round stones), pressing down each slice slightly to make it look a little bit tidier.  Bake for 20 mins till golden brown.

6.  Remove from the stone with a mini serving spatula and cool on a stackable cooling rack, or serve immediately. I made mine in advance and reheated before serving.


Saturday, 16 June 2012

Vegan lemon cake

I LOVE lemons and citrusy tastes and have been experimenting with vegan lemon cakes for a while.  This one has a lovely clean taste to it, not interfered with in any way.  I've felt others have been oddly "muddy" with the addition of other ingredients to substitute for the eggs. Here the lemon juice itself does the job by activating the baking powder and making everything light and fluffy.

One of these doesn't last long in our house!

You can make these with gluten free flour (I've done it by just subbing in Dove's Farm self raising with nothing else added as their mix already has xanthan gum in it).

Another option is little cupcakes.  One batch of batter will make you 12 normal sized cupcakes.  Bake these for about 18 minutes.


Ingredients

2 cups Self Raising Flour
1 cup Sugar
1 tsp Baking Powder
Zest & Juice of 1 Large Lemon (reserve 2 teaspoons of juice for the icing)
100ml Vegetable Oil
170ml Cold Water

Icing
1 cup Icing Sugar
2 tsp reserved lemon juice (plus a little water if needed)

Method

Preheat the oven to 200°C

1. Measure out the flour and sugar using a measure all cup and add to a classic batter bowl.

2. Measure the baking powder using an adjustable measuring spoon and add to the bowl.

3. Zest the lemon with the Microplane zester, add to the flour and mix well with a stainless steel whisk to aerate.

4. Use the citrus press to squeeze the lemon into an easy read measuring cup, reserve two teaspoons for the icing,  and add to the bowl.

5. Add the oil and the water, measured in the easy read measuring cup, and mix thoroughly with a mix n scraper to make sure all is combined well.

6. Pour into a stoneware loaf pan or lined loaf pan and bake for 30 minutes until fully cooked. Check it's cooked by listening to it - put your ear up close and if it's making little crackly-pop noises it could take a few more minutes. Or poke with your finger - if it bounces back nicely, its done!

7. Remove from the loaf pan and cool on a stackable cooling rack.

8. When cool, make the icing for the top. Sieve the icing sugar and stir in lemon juice and drops of water until the consistency is wet enough to spread over the cake.

TIP:  If your lemons are small use the juice of one and a half in the cake and the rest for the icing.  My lemons seem to have been organic Monsters recently!

Thank you to The Ethical Chef for the inspiration and original recipe.

Saturday, 14 April 2012

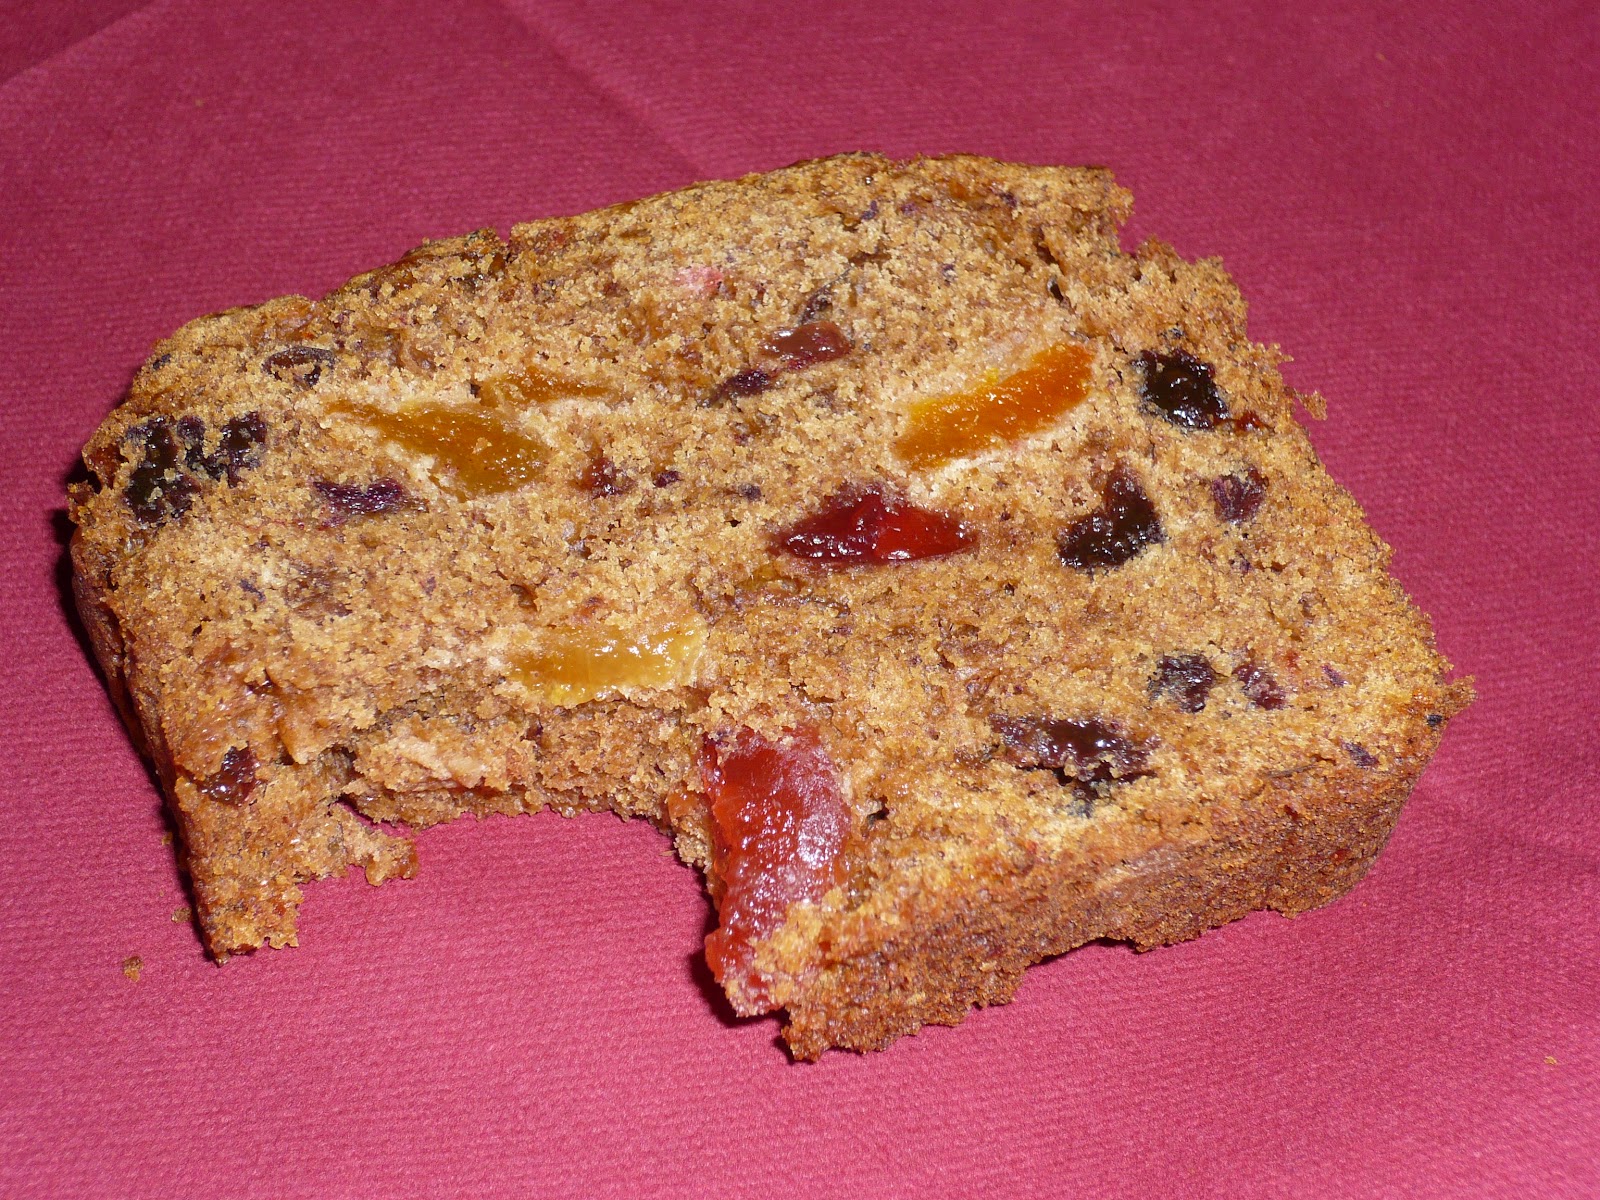
Mrs Mac's Cake (egg and dairy free/vegan and can be gluten free)

Fruit cake!
This is a family recipe that has been around a while and uses a traditional method of boiling the fruit to make them nice and moist.  My mum has been cooking it for ages and for some reason I always associate it with Easter.  Maybe its the fruit cake thing?

Anyway, as usual, with most family recipes, I've been trying different egg replacers to make it friendlier for our little person who is egg and dairy free.  I hate commercial egg replacers with a bit of a passion, and try everything else I can instead. This has been tried with half a banana in place of the one egg in the original recipe, but it did leave a bit of a banana flavour, which I wasn't keen on, so I tried apple sauce instead - bingo!

Then, because I'm lazy and I can't be bothered with the hassle of making apple sauce, I tried it with a jar of apple baby food - excellent!  And then I finally settled on grating an apple in with the fruit as they boil at the beginning, removing the need for the sauce at all! The boiling makes the fruit very moist and squishy and just delicious, and the apple just disappears into the mix.

You can make this GLUTEN free too, just substitute in gluten free flours (I like Dove's Farm) and add a 1/2 tsp xanthan gum to help it stick together - its a bit crumbly otherwise.

So here it is, my favourite fruit cake:


Mrs Mac's Cake

Ingredients

1 cup water
3/4 cup sugar
100g Pure spread or butter if not dairy free
2 cups mixed fruit (I like a mix of dried apricots, dates, raisins, sultanas and glace cherries but it works with anything.)

1 eating apple such as a gala (or 1 egg)

1 cup plain flour
1 cup self raising flour

1tsp bicarbonate of soda
1tsp cinnamon


Method

1. Measure out the water, spread, sugar and fruit in an easy read measuring cup.  Place them in a large pan. If using larger fruit like dates or apricots chop them up with the professional shears first.

2. Grate the apple into the pan with a coarse microplane grater. Like I said, I'm lazy so I don't even bother peeling it - extra fibre is good!

3. Heat until boiling.  Boil for five minutes stirring all the time with a mix n scraper.

4.  Leave to cool slightly. (If you are using the egg let this mix cool completely and then stir in the egg, remembering you don't need the apple earlier on)

5.  Meanwhile measure out the flours in a classic batter bowl and pre-heat the oven to 160°C.

6. Add the cinnamon and bicarbonate of soda to the mix in the pan using an adjustable measuring spoon, and stir well - the mix will fizz and bubble as in the photo below.

Bubbly fruit mix after adding the bicarbonate of soda

7.  Pour the wet ingredients into the flour and mix it all together.

8.  Pour into a stoneware loaf pan, or lined metal loaf pan and bake for about 1 hour.  Check it's done by pressing on the top of the loaf - if it bounces back nicely it is done. (I also listen to it!  If you can hear little crackles then chemical reactions are still happening and it may need a little longer!)

9.  Cool on a stackable cooling rack, and wait for it to be fairly cool before slicing - I know its difficult but if you cut into it too early it all crumbles and is a bit squooshy.  It keeps well for several days in an airtight container, and may even be better on day 2 and 3!  (If it lasts that long)


Friday, 6 April 2012

Apple, sultana and cinnamon hot cross buns (egg free, dairy free, vegan)

Hot Cross Bun Tear and Share Style on the Medium Round Stone
Normally I take my time and add in lots of links to the products but I have several people champing at the bit for this one so here it is!

This can be vegan or not depending on whether you use the dairy free spread or butter and what kind of milk you use.  I got the inspiration for the tear and share style from a magazine last month, but I can't remember where!  And I based my recipe on one from Baking Mad.

Ingredients
625 g strong white bread flour
7g sachet fast action yeast
75g sugar
pinch salt
2 tsp ground allspice/mixed spice
2 tsp cinnamon
50 g Pure spread or butter
250ml milk (any kind you fancy!  I used soya milk)
125ml water
1 large bramley apple
125g sultanas (UPDATE!  Having eaten several I'd add more sultanas! Maybe double it to 250g?)

For the crosses:
6tbsp plain white flour
4tbsp water

For the glaze:
2tbsp sugar
2tbsp water

Method

1. Place the flour, yeast, sugar and salt in a classic batter bowl and stir together with a mix n scraper.

2. Measure out the spices using an adjustable measuring spoon and mix into the flour.

3. Melt the fat with half of the milk in a small pan, add the remaining cold milk and 125ml cold water, so that the liquid is luke warm.

4. Pour it into the flour mixture and mix in.

5.  Peel the apple, cut and core it with the apple wedger and then chop it into tiny pieces in the food chopper.

6. Add the sultanas and finely chopped apple to the dough and knead firmly for 10 minutes (or 5 minutes in a mixer with a dough hook or on the pizza dough setting in a breadmaker) until the dough is smooth and elastic.

7. Turn the dough onto a lightly floured work surface, divide it in two and then roll one half into a long sausage, cut into 10 equal pieces. And repeat with the next one, cut into 9 pieces.

8. Pinch the edges of each piece of dough up to the centre until you have a smooth ball, turn seam side down on the worktop and roll into a smooth ball.

9. Place the buns on a medium round stone allowing space for them to double in size. I used a concentric circle pattern with one in the middle, six around it and then 12 one the outside ring.  I lined up every second one on the outside ring with the inner ring and then put one in the space.  Hope that makes sense?


10. Cover with oiled cling film and leave in a warm place until the dough has doubled in size and is sticking together (see below).  I left mine about an hour.

11. When to dough is almost ready, preheat the oven to 180°C. Mix the plain flour with enough water to make a paste of a similar consistency to butter icing in a small prep bowl.

12. Place the paste in a plastic bag and snip the end off, then pipe crosses on the hot cross buns. I did a large line across the centre one and then smaller ones radiating out.  I then made a couple of rings all the way round to give the spider web effect. (Thanks to a fellow consultant Pauline, who suggested using the Easy Accent Decorator for this bit - probably less messy than the bag!)


13. Bake for 20 to 22 mins until the buns are golden and firm.

14. To glaze dissolve 2 tbsp caster sugar in 2 tbsp water, boil for a minute then brush over the hot buns with a silicone basting brush as soon as they come out of the oven to give a shiny glaze.

15.  Leave to cool slightly then enjoy with spread, jam, nutella, or naked, whatever you fancy!


Friday, 30 March 2012

Rock buns and Easter holidays

I can't wait!  The Easter holidays are nearly upon us and I've been on countdown this week.  With this in mind I've got a child friendly recipe for you that can be ready pretty quickly and always is a hit.

Do you remember rock buns as a child?  I always remember making them at nursery as a child for some reason! 

Later on as a nursery teacher they were a favourite with my little people too, and now my own children love them.  I always used to use the traditional Bero recipe which usually worked a treat, unless a certain member of staff got a go at the baking and then they really were ROCK buns!  You could bounce them off the walls!  I never did figure out what she was doing wrong.

This one won't be bounce-able and will be light and fluffy (unless you are THAT member of staff!).

I have to work without eggs in my kitchen so I've fiddled about until I got a fab light texture and enough sultanas/raisins to balance it out.  Hope you like them?

(Have you been to like my facebook page yet?  The first prize draw takes place on Saturday 31st March and you have to be in it to win it!)

egg free and dairy free rock buns in the sun, as we enjoy all this lovely weather outside in the garden


Rock Buns (egg free, dairy free and vegan)

Ingredients

250g self raising flour
90g sugar
90g butter or Pure Spread (for those who are non dairy)
100g sultanas or raisins or a mix of dried fruit.
3-4 tablespoons of milk (whatever kind you like)

Method

1. Preheat the oven to 190°C

2. Measure the flour into a classic batter bowl and stir in the sugar with a mix n masher.

3. Add the butter or spread and using a mix n masher blend it all together till you get breadcrumbs.  Or use your fingers and get rubbing - the children love this bit.

4.  Stir in the dried fruit.

5.  Add enough milk with an adjustable measuring spoon to make a soft but not sticky dough.

6.  Divide the mixture into roughly 12 heaps on a rectangle stone or any other flat stone/tray and cook for around 8-10 minutes until they are a light golden colour.

7.  Remove to a stackable cooling rack and eat either warm or cold.  These are best eaten on the day they are made, but honestly don't last long anyway!