Sunday, 14 October 2012

Chicken goujons (egg, dairy and gluten free)


My mum makes fantastic home made chicken goujons, or nuggets if you like.  I taste them and I'm transported back to my childhood, and a few amazing picnics when she made these and we took them along cold and dipped them in sauce to eat them with our fingers.

Having a little person with egg and dairy allergies makes the use of eggs to coat them really difficult. I went on a mission to find out how to make them for her (and us) without the addition of eggs so that we could have a happier and healthier alternative to chicken nuggets.

The fact that these are made at home means that the coating can be controlled and made gluten and wheat free too, depending on the flour or bread used for the breadcrumbs.  So I reckon you could make these pretty much allergy free!

I use this method to make home made fish fingers too.
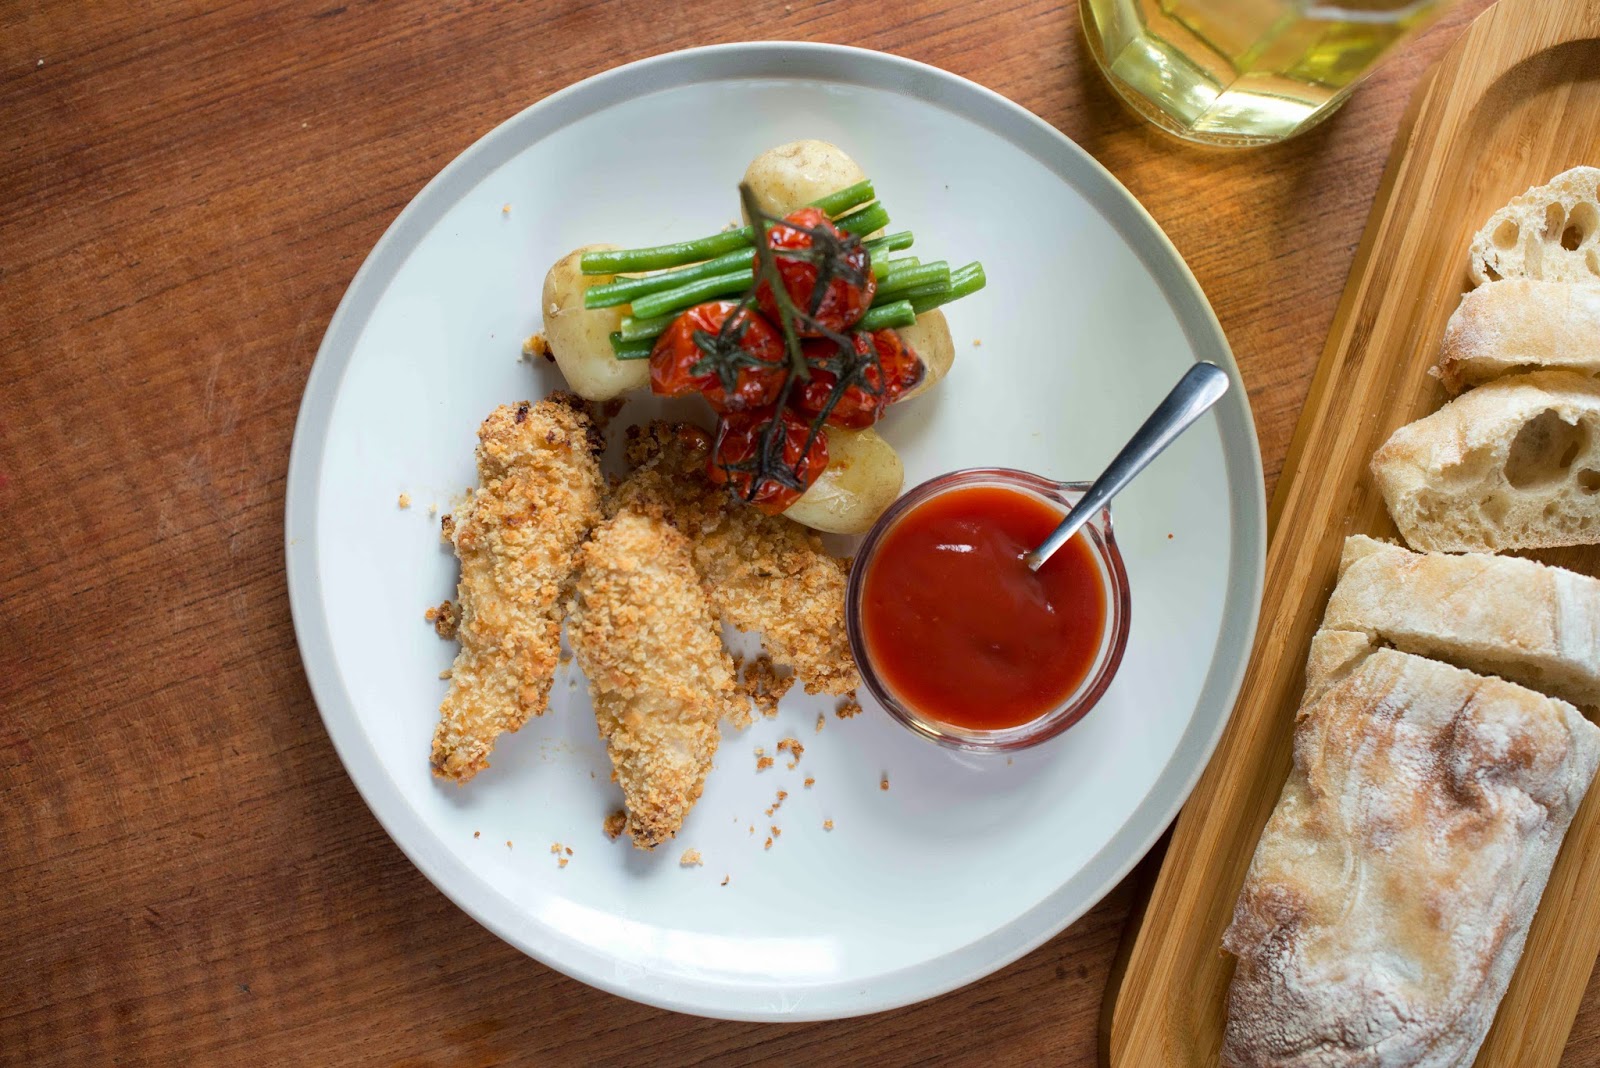
Serves 4

Ingredients

400g pack chicken breast strips or breasts cut into even sized strips or chunks
3 tablespoons plain flour (or corn flour if GF)
2 tablespoons oil
4 tablespoons non-dairy milk (I use soya)
Two ends of a loaf of bread (use any bread you like, gluten free if needed)

Method


Preheat the oven to 180°C

1.  Place the bread in a food processor and whizz until the bread is fine breadcrumbs.

2.  Put the oil and milk in a small batter bowl and whisk until well mixed and frothy with a stainless steel whisk.

3.  Put the flour on one plate and bread crumbs on another.


4.  Coat each chicken strip well by rolling it in the flour, then transfer to the oil and milk emulsion and coat well in that too.

5.  Place the strips on the breadcrumb plate and coat in the breadcrumbs by turning and patting them on.

6.  Place the chicken on a flat stone such as a medium bar pan (you'll need two of these) or a rectangle stone, and cook in the oven for 25-30 mins until golden brown.  You could fry these, but I find as they already contain oil in the coating they bake really well.


7.  I serve these with chips or mash, peas, and plenty of sauces for dipping.  My family particularly like sweet chilli sauce.


Thank you to HCampbellPhotography for the truly beautiful food shots!


Saturday, 22 September 2012

Pampered Chef Yorkshire Puddings disguised as Profiteroles.

Are they Yorkshire Puddings or are they Profiteroles?
I made these at the show I did last night and they are completely amazing.  So quick and easy and simply a Yorkshire pudding mix which then has cream and melted chocolate added.  I love the Stoneware 12-cup Muffin pan they are made in and it is definitely the key ingredient for the virtually fat free Yorkshire Puddings.

The best thing about these is you don't have to heat the Muffin pan to red hot before you pour in the batter, or put in chunks of lard or huge amounts of oil. These are cooked from cold (yes really!) and last night I even convinced a seasoned Yorkie maker that the Stoneware Muffin Pan could make hers even better.

So here's the super simple recipe...


Ingredients

1 Prep bowl Plain Flour (A prep bowl is 250ml)
1 Prep bowl milk
1 Prep bowl of eggs (3 eggs topped up with water if less than the full bowl)

Method
1. Place all of the ingredients in a Classic Batter Bowl

2. Beat till all combined with a Stainless Whisk; a few lumps are fine!

3. Pour into a Stoneware Muffin pan that has had the wells lightly oiled with a little vegetable oil on a silicone basting brush if its new.  If it is seasoned you need no oil at all!

4. Bake at 200°C for 25 mins for fluffy and puffy Yorkshires! (You can leave them in the muffin tin for a while once they come out of the oven and they won't collapse like traditional ones.)

To make profiteroles beat a tub of double cream with a double balloon whisk and squirt into the middle of the profiteroles with an easy accent decorator.  Pile them into a trifle bowl or onto a bamboo platter and pour over melted chocolate.  Also fabulous with syrup or jam.


Wednesday, 5 September 2012

Blueberry and Lemon Cupcakes (egg and dairy free, and vegan)

I have a complete obsession with all things lemony and have been wondering about how to make a lemon and blueberry cupcake for a while.  Then a thought; Why not adjust the lemon loaf cake and add blueberries?


So that is what I did this afternoon.  And Wow I'm glad I did.  Daughter number two ate two in quick succession and then asked for another!  (She didn't get another one in case you're worried about my parenting.)

Blueberry and Lemon Cupcakes

Ingredients

2 cups Self Raising Flour
1 cup Sugar
1 tsp Baking Powder
3/4 cup of fresh or frozen Blueberries
Zest & Juice of 1 Lemon
100ml Vegetable Oil
170ml Cold Water

Icing

1/3 cup Pure Spread
1/3 cup Trex
1 1/3 cups Icing sugar
1/3 cup blueberries

Method

Preheat the oven to 180°C

1. Measure out the flour and sugar using a measure all cup and add to a classic batter bowl.

2. Measure the baking powder using an adjustable measuring spoon and add to the bowl.

3. Zest the lemon with the Microplane zester, add to the flour and mix well with a stainless steel whisk to aerate.

4. Use the citrus press to squeeze the lemon into an easy read measuring cup,  and add to the bowl.

5. Add the oil and the water, measured in the easy read measuring cup, and mix thoroughly with a mix n scraper to make sure all is combined well.

6.  Fold in the blueberries.

7.  Spoon the better into twelve cupcake cases in the Muffin Pan and bake for 15-20 minutes until light golden brown. Poke one with your finger - if it bounces back nicely, its done!

8. Remove from the Muffin Pan and cool on a stackable cooling rack.

9. When cool, make the icing for the top. Put the blueberries in a pan and heat gently until the berries have burst and become nicely juicy.  Sieve the blueberries so you have just the juice and discard the skins.

10. Beat the Trex and Pure Spread together until fluffy, add in the icing sugar and one tablespoon of blueberry juice.  Beat until smooth, adding more blueberry juice as needed until you have a lovely smooth buttercream consistency.  Add a little water if you run out of juice and need more liquid.

11.  Ice using the Easy Accent Decorator with the small star nozzle fitted.  Top with extra blueberries if wished.

If you would like to do these gluten free, just sub in your favourite gluten free flour and about 1/2 tsp xanthan gum, and they turn out very nicely!

Wednesday, 29 August 2012

Ginger biscuits and lots of rain.

To say I got wet today is an understatement.  I headed out to collect daughter number one from school with the sky looking grey and a bit threatening, so I put daughter number two in the buggy with the raincover, changed out of sandals into something sturdier and put on my raincoat.  By the time I had managed to get half way along the road the heavens had opened, rivers ran across the pavements, drains bubbled, water fell off roofs in great sheets, and I was soaked to the skin!

Then the hail and thunder and lightening started.....by that time I was laughing and splashing through the huge puddles like a mad woman, while the streets emptied and others huddled in doorways.

I got to the school gates dripping wet, collected my daughter and then headed to the pool for her swimming lesson.  A comedy ten minutes ensued while the little one tried to dry my trousers with a hairdryer.  I gave up and steamed gently through the rest of the lesson!

When we finally got home I changed, dispensed warm drinks and toast and then went into the kitchen looking for solace.  I found it in the shape of these biscuits which remind me of childhood and have been in my mum's recipe folder forever.  I've recently added the stem ginger to these and find it gives a lovely additional layer of flavour.

Ginger Fairlings

Feel free to use any gluten free flour for these as it works pretty well.  They are a little crumbly but you could add a little xanthan gum to help prevent that (about 1/2 tsp is enough).  If you use Dove's Farm it already has this added in the self raising flour anyway so don't add any.

Ginger Fairlings (dairy and egg free/vegan)

Ingredients

4oz (1/2 cup) Vegan Margarine or butter
1 tbsp golden syrup
3oz (1/3 cup) sugar
6oz (1 1/4 cups) self raising flour
1 tsp ground ginger
pinch of bicarbonate of soda
2 pieces of stem ginger

Method

1. Preheat the oven to 180°C
2. Melt the margarine and syrup in a large saucepan over a medium heat.
3. Remove from the heat and add the sugar.  Stir well with a bamboo spoon.
4. Chop the stem ginger finely with a utility knife on a cutting board and add to the pan.
5. Add in the flour, ground ginger and bicarbonate of soda and stir well to mix everything to a dough.
6. Using the small scoop, scoop out balls and roll them lightly in your hands to make them smooth.  Place on a flat stone such as a medium round stone or medium bar pan.
7. I like to squash them down with a fork to make the pattern on the top but you could just give them a squish with the palm of your hand.
8. Cook for 10-15 minutes until golden brown. (Mine usually take precisely 12 mins!)
9. Leave to cool for a few minutes on the stone before removing to a cooling rack with a mini-serving spatula to cool.
10. Enjoy with a well deserved cuppa!

A nice cuppa and some vegan ginger fairlings  - ahhhh!

Saturday, 28 July 2012

Caramel icing on chocolate cupcakes.....

I had a serious chocolate craving this evening and decided I was going to make some of the wonderful cupcakes from Vegan Cupcakes take over the World.  Once they were baked I couldn't work out what kind of icing I wanted.  Hubby voted for mint, which was a good idea but there was no mint extract in the house so that was out.  Instead, I went flipping through my cookbooks for inspiration, and found....Caramel Buttercream Icing!  This got me so excited - its gorgeous and easily made dairy free too.

Caramel Buttercream Icing on Chocolate Cupcakes

So here it is; Caramel Buttercream Icing from The Primrose Bakery Book which is supposed to be for a triple layer cake (it would be amazing on my triple layer cake too) but I reduced the amount and used it to ice my cupcakes.  I've halved the recipe here for you to use on the cupcakes, so if you want to use it on a layer cake, just double it.

Caramel Buttercream Icing

Ingredients

45g butter (I used Pure Spread, vegetable)
4 1/2 tbsp semi-skimmed milk (I used soya milk)
165g light, soft brown sugar
180g icing sugar, sifted
1/2 tsp vanilla extract


Method

1. Combine the butter, milk and brown sugar in a heavy based saucepan and put on a high heat.
 
2.  Stir constantly with a bamboo spoon till melted and boiling. 

3. Boil for one minute, then remove from the heat and stir in half the icing sugar.

4. Allow the mixture to cool then add the rest of the icing sugar and vanilla extract.  Beat until smooth.

5.  Ice the cakes using a small spreader.  If the icing thickens too much as you are spreading it on the cakes, simply warm a little and beat again.

Apparently this keeps in the fridge for up to a week, so put any leftovers into a prep bowl and put a lid on it. (Not in our fridge - I'd have it eaten direct from the bowl well before the week was up.)

To use just warm a little and beat till smooth.